Here is everything you need to know to customize your first Provider and start booking with your Periodic account.
Step 1: Create your Provider (Business)
- Decide on a name, subdomain, and timezone
- Add any additional settings such as logos, images, and custom vocabulary
Step 2: Create Bookables (Reservation Types)
- Decide on the names and types of reservations you would like to offer
- Set availability windows
Step 3: Create a Form Template
- Decide on the data you want to collect in each booking
- Create a custom Form to attach to Bookable(s)
Step 4: Create Message Templates
- Create custom Message Templates to attach to Bookables
Step 5: Create and Customize Resources
- Decide on names and types of Resources
- Connect external calendars
Step 6: Attach everything to Bookables
- Attach Forms, Messages and Resources to Bookables
- Add any other additional booking requirements
Creating Your Provider
Providers are entities that offer Bookable services and are often different business locations or departments that have unique booking needs. Providers can host one or more Bookables. Each Provider also has a unique subdomain.

Basic Provider Settings
Providers require a Name, Subdomain, and Timezone. Any additional settings are helpful but not required in order to continue.

Additional Provider Settings
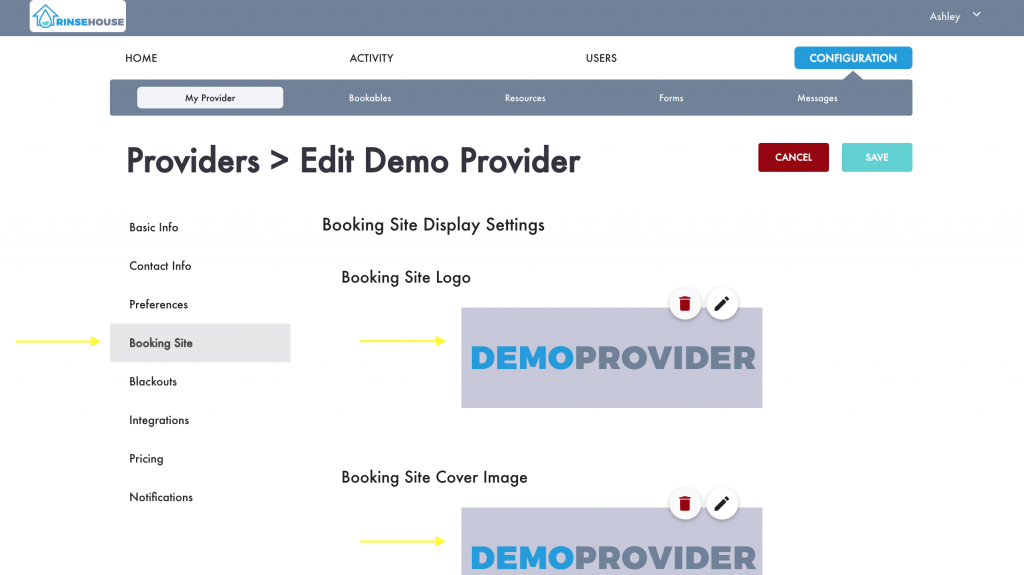
Contact Info is all of the relevant information to a given Provider that is mostly displayed to customers when booking. Booking Site settings also display on the Booking Site.


Creating Bookables
Customers make Reservations on Bookables. Bookables are the reservation types that Providers make available for booking. Bookables live within Providers, but Resources, Forms, and Message Templates all attach to Bookables.
Basic Bookable Settings
Bookables require a name, Provider association, availability windows, and a Form to collect the First Name, Last Name, and Email from customers booking. For now, you will create a Bookable with a name, Provider association and availability windows. In the last step of the setup process we will attach the required Form and all other Bookable options.

Creating Form Template(s)
Form Templates allow you to create questions and messages to gather and communicate information to customers when booking. All bookings require, but are not limited to, First Name, Last Name, and Email questions. Forms are then attached to Bookables to ultimately display to customers booking reservations.

Creating a Form
All Forms require a Form Name and at least one Form Section. The majority of Forms only need one Form Section. Both the name and section are visible to the customer.


Adding Form Questions
After creating a Form Name and Section, you can start creating Form Questions. There are many different Question types that allow you to collect and store reservation data.

Form Creation Key Terms
Question Type – The type of question asked to a customer booking a reservation.
Admin Name – Admin Name is a name that can be used to reference this question internally. It will never be displayed to your customers. It is useful for targeting this question when passing data to the booking site via URL parameters or when displaying customer responses in SMS and Email notifications. The Admin Name can also be referenced when integrating with third-party services or APIs.
Question Prompt – Titles the question to make it clear to the user what information is being asked for.
Question Placeholder – Field for a “sample answer” or additional instructions for a question.
Question Description – Field for a question description or additional instructions.
Required – A question that must be answered for a customer to continue booking.
Roster Question – Only applicable when a customer can book multiple seats on a single time slot. This flag indicates whether this question is used to gather information for additional attendees on a given time slot.
Internal – This flag makes the question invisible to the customer on the Booking Site and is only present to administrators on the Dashboard.
Designated Contact – Only present on Email and Phone Number question types. This setting flags whether or not an Email or Phone Number should receive notifications.
User Profile Reference Name – This field is used as a key to store responses to this question directly on a customer user’s profile in the Dashboard.
Display – Optionally displays a question based on the response of another question. The optional display works with Select, Radio, and Checkbox questions.
Price Modifier – When payments are in effect this setting can be used to add or subtract from the price of a booking.
Value Function – Similar to the Price Modifier, this setting can optionally alter the price of a booking by referencing other questions. The Value Function creator should only be used by administrators building complex reservations.
Creating Message Template(s)
Message Templates allow you to create customized email and SMS notifications to send to staff and customers through the booking process.
Message Templates are made available to any Bookable on the associated Provider(s). Messages must be attached to Bookables and then associated with a Message Trigger in order to send to customers and staff through the booking process.

Creating Resources
Resources attach to Bookables. These are the optional people or things that can be associated with a Bookable and reservation. Resources can also host connections to external calendars (Google & Outlook).
A Resource can be manually selected or automatically assigned to a time slot on a reservation through the Bookable setting. Automatic assignment is helpful for large sales or support teams and direct booking links, while manually selected Resources are useful when wanting to allow the customer to select the person or thing associated with a booking.

Attaching Everything to a Bookable
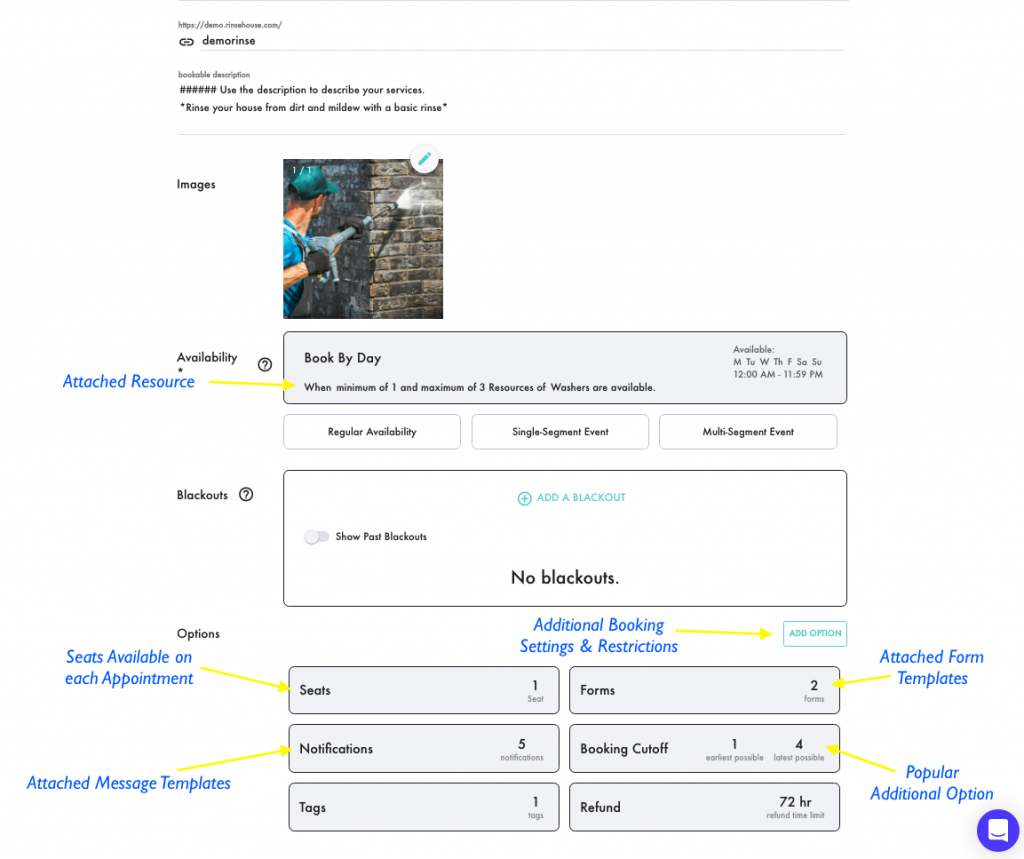
This is the final and most important step in launching your booking system. Resources, Form Templates, and Message Templates are all inaccessible to customers and rendered useless until attached to Bookables.
Bookable Configuration

Attaching Resources to Bookables
Click on the applied Availability Window to attach a Resource or Resource Group.

Resource Assignment Methods
Required Resources – Resource is assigned automatically with every reservation.
Priority Order – Resource is assigned automatically and never seen by the customer booking. The Resource first on the list will always be assigned if available and if not, then the second Resource, then the third Resource, etc.
Round Robin – Resource is assigned automatically and never seen by the customer booking. Resources will be assigned to reservations in a looping order and as evenly as possible.
Customer Choice – Resource is selected manually by the customer when booking.
Resource Claim – Customer books a reservation without a Resource and the user managing that Resource later claims that reservation. The customer never sees the Resource when booking.
Attaching Message Templates to Bookables
Click on the Notification Option to attach Message Templates.


Attaching Forms to Bookables
You can display Form(s) either before or after the Date/Time Selection Step to the customer on the Booking Site. Whichever Form contains the First Name, Last Name, and Email questions must come after the Date/Time Selection.

Cheat Sheet of Key Terms
Dashboard – Where administrators create and adjust settings.
Booking Site – Where customers book reservations.
Provider – Providers are entities that offer Bookable services and are often different business locations or departments that have unique booking needs. Providers can host one or more Bookables. Each Provider also has a unique subdomain.
Bookable – Customers make Reservations on Bookables. Bookables are the reservation types that Providers make available for booking. Bookables live within Providers, but Resources, Forms, and Message Templates all attach to Bookables.
Resource – External calendars are attached to Resources and Resources are attached to Bookables. Resources are the optional people or things that can be associated with a Bookable.
Resource Group – A Group of Resources that are optionally attached to Bookables. Resource Groups can automatically assign one or more Resources to reservations or give customers the option to choose the Resource(s) associated with a reservation.
Form Template – Form Templates allow you to create questions and messages to gather and communicate information to customers when booking. All bookings require, but are not limited to, First Name, Last Name, and Email questions. Forms are then attached to Bookables to ultimately display to those booking reservations.
Message Template – Message Templates allow you to create customized email and SMS notifications to send to staff and customers throughout the booking process. These templates are then attached to Bookables and triggered to send when reservations are booked.

